Orthogonal Axonometry
Axonometry is a parallel projection onto one image plane - axonometric image plane
r,
which does not coincide to any of the coordinate planes p,
n, m.
Space figures can be mapped onto the axonometric image plane,
together with their ortgohraphic views to the coordinate planes,
and the entire coordinate trihedron Ox+y+z+.
The direction of projection s can be perpendicular to the axonometric image plane r,
and then we speak about orthogonal axonometry.
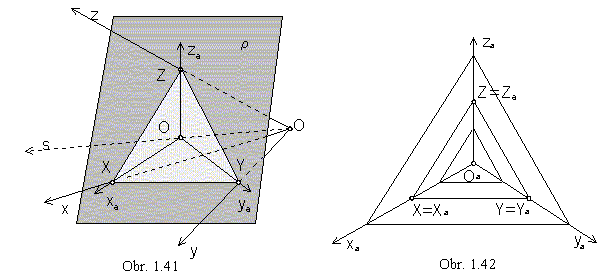
Axonometric image plane r intersects all coordinate planes,
rÇp =XY, rÇn =XZ,
rÇm =YZ (obr. 1.41).
Triangle XYZ, with vertices in the intersection points of the coordinate axis x, y, z
and axonometric image plane r,
is the axonometric triangle (or Pelc triangle).

Orthographic views of the coordinate axis x, y, z in the axonometric image plane r,
are lines xA, yA, zA in the altitudes of the
axonometric triangle XYZ.
Orthographic view of the origin O in the r is the orthocentre of the triangle XYZ.
Figure Oaxayaza is denoted
the axonometric axial cross.
Axonometric image plane r can be translated in the direction s , while the size of the
axonometric triangle XYZ will change, with respect to the different distance of the plane r and the origin O,
but the view of the axonometric axial cross will remain unchanged (obr. 1.42).
All Pelc triangles are similar to each other, they are scaled by a ratio in the homothety with the centre in the origin O,
and they determine the same axonometric projection.
The axonometric triangle
XYZ is a triangle with all acute angles, in the case of the orthogonal axonometry.
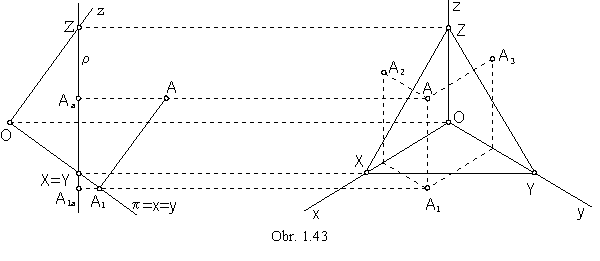
Point A in the space can be mapped orthogonally to the ground view A1 in the ground
plane.
Orthographic view Aa of the point A in the axonometric image plane r -
axonometric view,
and the orthographic view A1a of the ground view A1 in the
r - axonometric ground view,
form a pair of axonometric views of the point A related in the direction of the axis z view,
perpendicular to the side XY of the axonometric triangle.
If the drawing paper coincides with the axonometric image plane,
the indication of the axonometric views can be omited, index "a" is not used (obr. 1.43).

Point A is unambiguously determined by a pair of its axonometric views (A, A1).
Similarly, the point A in the space can be determined by an ordered pair of axonometric views :
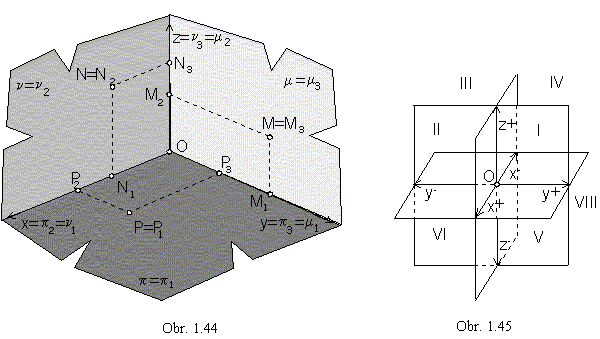
Axonometric ground view and axonometric view of the ground plane coincide (z=0 for all points),
axonometric front view of the ground plane is in the view of the axis x,
and axonometric side view in the view of the axis y (obr. 1.44).
All points in the ground plane have got coincidental axonometric view and axonometric ground view, P=P1.
Similarly, for all points in the frontal plane N=N2,
axonometric ground view of the frontal plane is in the view of the axis x,
and axonometric side view in the view of the axis z.
Axonometric ground view of the side plane is in the view of the axis y,
axonometric front view in the view of the axis z,
and M=M3 for all points in the side plane.

Planes p, n, a m divide the space into eight octants (obr. 1.45):
I. x > 0, y > 0, z > 0 V. x > 0, y > 0, z < 0
II. x > 0, y < 0, z > 0 VI. x > 0, y < 0, z < 0
III. x < 0, y < 0, z > 0 VII. x < 0, y < 0, z < 0
IV. x < 0, y > 0, z > 0 VIII. x < 0, y > 0, z < 0
Visibility in axonometry is applied with respect to the Ist octant, trihedron Ox+y+z+,
in the axonometric view of the mapped figure.
Coordinate axes x, y, z form some angles to the axonometric image plane r .
If all 3 angles are different, then the length of the views of unit line segments jx, jy and jz
on coordinate axes are different, axonometric triangle XYZ is a scalene triangle and axonometric projection is a trimetry (obr. 1.46a).

If two of the coordinate axes are at the same angles to the axonometric image plane r, the unit line segments on these axes are projected equaly, the axonometric triangle has two equal sides and the axonometry is a dimetry (obr. 1.46b).
If all coordinate axes x, y, z are at the same angles to the axonometric image plane r, views of the unit line segments are on all axes equal, the axonometric triangle is an isoscalene triangle and the axonometry is an isometry (obr. 1.46c).
Let the general axonometric projection be given by the image plane r and direction
of projection s, s Ë r.
Numbers p, q, r
determining the ration of the length of views jx, jy, jz
of unit line segments j on the coordinate axes
![]()
are scaling coefficient (showing the ratio of shortening or lengthening on axonometric views of separate coordinate axis).
The scaling coefficients satisfy the following equation:
p2 + q2 + r2 = 2 + cotg2j, j = Ø sr
where j is the angle that the direction of projection s formes to the image plane r
.
In the orthogonal axonometry (s Ë r, j = 90° ), the equation is in the form
p2 + q2 + r2 = 2.
On technical drawings, where ground views, or side views and profiles of the mapped figures are the most important once,
different oblique axonometric projections are widely used.

Military perspective is a projection method suitable for technical drawings in urban architecture, in design of habitations and suburbs. Costruction of views of complex objects with complicated ground views and not-easy-to-survey structures is relatively easy. Views of coordinate axes x and y are perpendicular, and the scaling coefficients satisfy the ratio
p : q : r = 1 : 1 : 1, it means jx = jy = jz = k.j, k > 0 (obr. 1. 47a).
Cavalieri perspective is an oblique projection with the image plane parallel to the frontal plane or the side plane.
It was widely used in the 16th and 17th century, for constructions of maps (called veduty) of important towns and settlements.
Views of coordinate axes x and z, or. y and z are perpendicular, and
p : q : r = 1 : 1 : 1, jx = jy = jz = k.j, k > 0 (obr. 1. 47b).
Both above projections were used for military purposes, the practical advantage of easy constructions overruled the readibility of the pictures and realism of mappings, in both methods angle j = 45°.
Oblique projection is a bit more realistic mapping mostly used on technical drawings in mechanical engineering.
Views of coordinate axes x and z, or y and z are perpendicular, and ratio of scale coefficients is
1 : q : 1, or p : 1 : 1 (while q, or p is from the interval (0, 1)).
In so called technical projection,
the oriented angle of the coordinate axis y to the view of the coordinate axis x
is equal to 135 °, and
jy = ![]() (obr. 147c).
(obr. 147c).